
1. What are illuminated and backlit mirrors?
Illuminated mirrors are mirrors that integrate a light source, such as LED lights, along the edges or behind the mirror surface. Backlit mirrors have a hidden light source on the back of the mirror.
2. What are illuminated and backlit mirrors used for?
Illuminated mirrors are mainly used to enhance lighting during daily activities such as makeup application, shaving, or facial and clothing care. These mirrors are equipped with built-in lights, which can be placed around the mirror surface or along the edges. Direct lighting helps improve visibility, reducing shadows and allowing you to see details better, such as when applying makeup or caring for your skin. Backlit mirrors, on the other hand, are designed to offer soft, uniform lighting that comes from the back of the mirror. This type of lighting is particularly useful in environments like bathrooms, bedrooms, or reception and living spaces. Backlighting creates a diffused light effect that enhances the atmosphere and visibility without being glaring. The main features and advantages of backlit mirrors are uniform and diffused lighting coming from the back of the mirror, which distributes evenly, reducing shadows and improving overall visibility. This is especially useful when you want to illuminate a room with indirect light rather than direct light which might be too intense.
3. What is the difference between an illuminated and a backlit mirror?
The main difference lies in the position of the light source. Illuminated mirrors have the light integrated into the mirror surface or along the edges, while backlit mirrors have a hidden light on the back of the mirror that emits indirect light, creating a soft, diffused luminous effect.
4. How are illuminated and backlit mirrors installed?
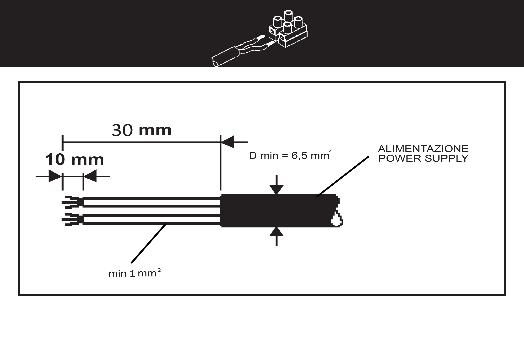
Cesini Design mirrors are easy to install, but it is always recommended to rely on qualified technical personnel. When handling the mirror, it is necessary to avoid impacts and excessive pressure on the surface, as this could cause fractures, resulting in the risk of splinters and glass fragments. It is advisable to wear protective gloves during all mirror assembly or moving operations to prevent the risk of cuts or injuries. Installation must be carried out by two people to ensure safe handling and reduce the risk of the product falling, which can cause serious or fatal compression/cut injuries. The main steps are: 1. Prepare the installation area by checking the wall or vertical surface for the presence of a power outlet. 2. Verify that the wall on which you intend to install the mirror has a load-bearing capacity suitable to support the product. Also verify that the screws are compatible with the type of wall/support to which the retaining brackets will be fixed; otherwise, they must be replaced with suitable screws. It is advisable to use the kit provided with the mirror. 3. Mark the points to be drilled on the wall/surface, first checking the correct vertical/horizontal position and the relative center distance between the holes, aligning the mirror to the desired height. 4. Using a drill and a suitable bit, make the holes, taking care not to damage any pipes or other items that may be in the depth. If the holes are made in a masonry wall, insert the wall plugs, then fix the relative supports/hooks and make sure they are stable and well anchored. Cesini Design mirrors have a double fixing system (top and bottom) which ensures the mirror is stable and adheres to the wall, avoiding possible oscillations and/or movement. 5. Carry out the electrical connection (qualified technical personnel is highly recommended at this stage), check the functionality of the emergency devices upstream of the circuit and disconnect power, ensure the system voltage complies with the product, and proceed to connect the wires coming out of the wall with those on the back of the mirror as shown in the figure.
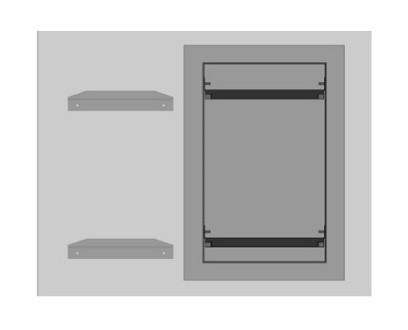
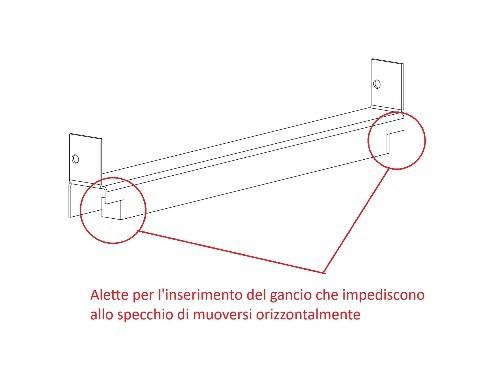
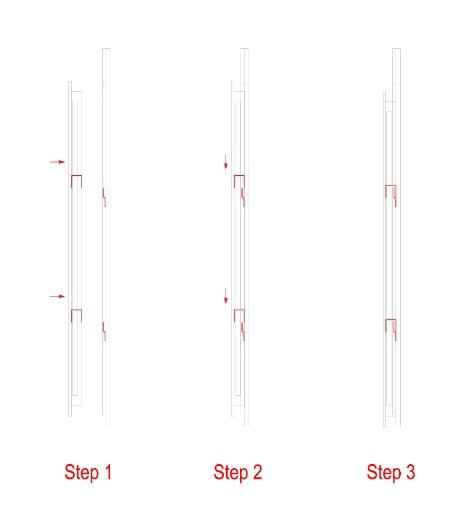
6. Carefully position the mirror on the supports respecting the "UP-ALTO" indication on the back, paying particular attention that during product handling the insulation of the cables is not damaged by cuts and/or crushing against metal parts (brackets and hooks), which could cause dangerous current leaks and/or short circuits. It is also important to check that the product is stable and that the hooks support the weight without problems. The two hooks placed above and below must correspond to the respective "U" profiles on the back of the mirror and be in the correct position to allow the anti-slide tabs to fit perfectly into the hooks.
5. How much power do LED illuminated mirrors consume?
The energy consumption of illuminated mirrors mainly depends on the total power of the lights integrated into the mirror. Illuminated mirrors with LED technology offer high energy efficiency and long life. Calculating energy consumption is measured in watts (W), and to estimate how much an illuminated mirror consumes, you can consider the following factors: 1. LED light power: Illuminated mirrors with LEDs usually have a power ranging from 5 W to 30 W, depending on the size of the mirror and the light intensity. 2. A small mirror might consume about 5-10 W. 3. A medium or large mirror might consume about 15-30 W.
6. Can I adjust the light intensity in the mirror?
Adjustment can occur in several ways. Cesini Design illuminated mirrors have three modes for this adjustment. 1. Integrated touch switch that allows ON/OFF switching and adjustment. 2. Touch panel (to be installed near the mirror) that allows you to change brightness from 1~100% by touching the dimmer cursor on the slider device. 3. "Tuya Smart" app which, via the MiBoxer accessories that the mirrors can be equipped with, allows brightness adjustment from the smartphone.
7. How do you clean an illuminated or backlit mirror?
Cleaning an illuminated or backlit mirror requires care to preserve its functionality and aesthetics, avoiding damage to surfaces or electronic components. Here is a step-by-step guide. 1. Turn off the power for safety, disconnect the mirror from the electrical supply. 2. To clean the mirror surface, use a specific glass cleaner or a homemade solution of water and white vinegar, a soft or microfiber cloth that does not scratch the surface, spray the cleaner on the cloth (never directly on the mirror to prevent liquid from penetrating the lighting components) and wipe in circular motions. 3. To clean the LED lights or the frame, use a dry or slightly damp cloth to remove dust or fingerprints, avoid water and do not apply water or cleaners directly onto the light areas or the gaps between the mirror and lights. 4. After cleaning, check for any remaining streaks or fingerprints and wipe again with a dry cloth to polish. 5. For general maintenance, remove dust regularly to prevent buildup, clean the mirror every 1-2 weeks with a dry cloth, avoid abrasive products, do not use abrasive sponges, pure alcohol, or aggressive chemicals that could damage the surface or LEDs. If the mirror is in a bathroom, good ventilation is useful to prevent humidity from causing streaks.
8. Can backlit mirrors be used in humid environments like the bathroom?
Yes, backlit mirrors can be used in humid environments like the bathroom, but it is important to choose a model specifically designed for this use. Here are some fundamental aspects to consider: 1. Humidity protection (IP rating), check that the mirror has an adequate degree of protection (e.g., IP44 or higher). This indicates that the product is protected against the ingress of solid objects and water splashes, making it suitable for humid environments. IP44 is protected against water splashes from all directions. IP65 or higher is only necessary for very exposed areas, like the shower or near the tub. 2. Installation regulations and bathroom safety zones. Follow local electrical regulations that divide the bathroom into zones (zones 0, 1, 2, and 3) based on distance from water sources. The mirror must be suitable for the zone where it will be installed. For example, zone 2 (up to 60 cm from sink or tub) requires IP44 or higher, while non-exposed areas further from water sources have less severe restrictions. 3. Humidity-resistant materials, choose a mirror with corrosion-resistant materials, such as anodized aluminum or stainless steel, to prevent humidity damage to the frame and mirror. LED lights must be sealed and protected to avoid problems caused by condensation. 4. Ensure good ventilation in the bathroom helps prevent condensation from forming on the mirror and increases the lifespan of electronic components. 5. Prefer professional installation to ensure safety and regulatory compliance. Installation should be carried out by a qualified electrician, especially if the connection is direct to the electrical system. If you follow these indications, a backlit mirror can be an excellent addition to the bathroom, offering functionality and a modern touch. If you need help choosing a specific model, we are at your disposal!
9. Can I use an illuminated mirror as the only light source in a room?
Yes, it can be used as the only light source in a room, but it depends on several factors. Here's what to consider: 1. The light intensity of the mirror (Lumens), check the light output of the mirror measured in lumens. To be a primary light source, the mirror must emit an adequate amount of light. In a bathroom or small room, you need about 200-500 lumens/m². In larger rooms, a mirror with higher brightness or supplementary lighting might be necessary. Illuminated mirrors are often designed to provide accent or functional light, not to fully illuminate an entire room. 2. Type of lighting, light direction, and light color are determining factors. Backlit mirrors emit diffused and indirect light, ideal for a soft atmosphere but not for illuminating an entire room, while mirrors with front or integrated lights can provide more directional and functional light. Color temperature (Kelvin) affects the atmosphere: warm light (2700-3000K) creates a cozy atmosphere but is less intense; natural light (4000-5000K) is ideal for bathrooms or work areas; cool light (6000K and above) is suitable for rooms requiring greater brightness. 3. Room size: for small rooms, like bathrooms or hallways, a high-quality illuminated mirror may be sufficient; in large rooms, it will need to be combined with other light sources, such as ceiling lights, lamps, or wall sconces. 4. Space functionality: for example, in a bathroom, an illuminated mirror can be sufficient, especially with high-brightness LEDs; for a bedroom or living room, it can contribute to lighting but is usually not sufficient alone; for studies or work areas, an illuminated mirror hardly provides enough light for tasks requiring high visibility. 5. Complementary solutions: if you want to use an illuminated mirror as the only light source, choose a model with high light output and integrate any accent lights (e.g., hidden LED spots or wall lamps) to ensure uniform light distribution. If you have a specific room in mind, we can help you calculate the necessary brightness or suggest suitable models!
10. What is the lifespan of the LED light in an illuminated mirror?
The lifespan of an LED light in an illuminated mirror depends on the quality of the LEDs used, the frequency of use, and heat dissipation. Generally, the typical lifespan of most LEDs is estimated at 20,000-50,000 hours. This equates to several years of normal use (e.g., 3-4 hours per day).
11. Can backlit mirrors be used as a night light?
Yes, backlit mirrors can be used as a night light, and they often represent an elegant and functional choice for this purpose. However, there are some precautions to evaluate: 1. Choose a model with good energy efficiency and a high level of safety. 2. The ability to adjust the light intensity. 3. The color temperature of the light between 2000K and 3000K, adequate to obtain warm, soft light. 4. The position contributes to obtaining soft, subdued lighting. In summary, a backlit mirror can be an excellent night light, especially if designed and configured correctly for this purpose.
12. Are backlit mirrors suitable for installation in outdoor environments?
Yes, make sure you choose a model that has an adequate degree of protection, such as IP65 or higher, which indicates that the product is dust-tight and protected against water jets. Furthermore, the backlighting source, which consists of LEDs, must be designed to withstand environmental conditions. Cesini Design can design and manufacture these backlit mirrors specifically to withstand external environmental conditions.
13. Do I need to drill holes in the wall for installation?
Yes, most illuminated and backlit mirrors require drilling holes in the wall to mount the supports and fix the mirror. However, if you opt for an adhesive or no-drill model, you can avoid this operation. Ensure the wall is solid and able to support the mirror's weight.
14. How do I know if I can install an illuminated mirror on my wall?
Ensure the wall is suitable to support the mirror's weight. Plasterboard walls may require specific plugs or reinforcements. Make sure the surface is flat to avoid tilted installations. The illuminated mirror requires an electrical connection. Check for a nearby outlet or a wired light point. Verify whether you need the mirror to have an integrated switch or if you can connect it to an external switch. Ensure the electrical system complies with safety regulations, that there are emergency devices upstream of the circuit, and that it is equipped with grounding. Consider the available space and choose plugs and screws adequate for the mirror's weight. If the mirror uses LEDs, check that the transformer (if included) is correctly sized. For installation, you need a drill with bits suitable for the wall type, a level to ensure the mirror is straight, a screwdriver or driver, plugs and screws specific for the mirror's weight, and possibly gloves to avoid damaging the mirror surface. If installation occurs in humid environments like the bathroom, follow local regulations regarding electrical safety. In case of doubts or lack of skills, rely on a certified electrician. Do you have a specific model or space to consider? Contact us, we can help you evaluate the details!
15. Can I install a backlit mirror without an electrician?
Installing a backlit mirror may seem simple, but generally, it is advisable to have some knowledge of electrical systems, especially if the installation involves direct connection to the home's electrical network. If the backlit mirror is equipped with a pre-installed power plug (e.g., a plug that can be connected to an outlet), installation might be simple and you might be able to do it without an electrician. In that case, you would only need to fix the mirror to the wall and plug it into the electrical outlet. However, if your backlit mirror requires fixed wiring (i.e., it must be directly connected to your home's electrical system), it is advisable to call a qualified electrician. Installing electrical components carries risks, such as short circuits or safety issues, if not done correctly. If you are unsure of your abilities, an electrician will guarantee a professional installation.
16. Can I install a backlit mirror in a bathroom without worrying about safety issues?
Installing a backlit mirror in a bathroom involves some special precautions, as bathrooms are high-humidity environments and carry greater risks regarding electricity. However, if you follow some guidelines and take precautions, you can significantly reduce the risk. Here's what to consider for safe installation: 1. IP Certification (Humidity Protection), make sure the backlit mirror is certified for use in humid environments. Certification like IP44 or higher ensures good protection against humidity. 2. Installation location, avoid installing it in an area where it could be exposed to direct water flow (such as above a tub or shower) without adequate protection. Electrical regulations indeed provide that certain areas, such as those closest to the shower or tub, are particularly protected by safety devices like residual-current devices (RCDs). 3. Electrical system that complies with regulations, having a residual-current device upstream, a grounding system that discharges any electrical leaks, cables and outlets protected against humidity. If the mirror has a cable to connect to an outlet, ensure the outlet is waterproof. 4. Installation and maintenance must be carried out professionally to ensure safety regulations are respected. In conclusion, to install a backlit mirror, it is always good practice to be concerned about safety-related issues.
17. What type of wiring is needed for installing an illuminated mirror?
For installing an illuminated mirror, wiring that provides a safe electrical connection to power the integrated lighting is necessary. The illuminated mirror must be connected to the home electrical network, usually to a 220V outlet (in Italy). The wiring must follow local electrical regulations to ensure safety. The necessary wires are: Phase (L): the wire carrying the electric current, Neutral (N): the current return wire, Ground (PE): protection wire, especially if the mirror has metal components or is positioned in humid environments (like the bathroom), to avoid the risk of electric shock. The illuminated mirror can be connected directly to the electrical network via a switch (to turn the light on and off). Some illuminated mirrors may have an integrated transformer (in case of low-voltage lighting), which reduces the voltage and makes it safe for the lights to operate. It is essential that the wiring is carried out according to safety regulations and, if necessary, by a qualified electrician. In environments like the bathroom, protection zones (e.g., zone 0, 1, 2) must be respected to avoid direct contact with water. Illuminated mirrors often have a touch or sensor switch, but alternatively, they can be controlled via a wall switch. Remember that each model of illuminated mirror may have different specifications, so it is important to consult the instructions provided by the manufacturer for a correct and safe installation.
18. Are backlit mirrors compatible with dimmer switches?
Yes, backlit mirrors can be compatible with dimmer switches, but it depends on the specific characteristics of the mirror and the type of lighting it uses. Here are some considerations: If the mirror uses LED bulbs, many LED models are dimmer-compatible, but it is important to check that the mirror's driver or transformer is dimmable. Some LED drivers do not support dimming and may not work correctly with a dimmer. If you wish to use a dimmer to adjust the light intensity of the mirror, make sure the dimmer itself is compatible with the type of lighting. Dimmers designed for LEDs, for example, are different from those for incandescent bulbs and may be necessary to achieve the desired control without flickering or malfunctions. If the backlit mirror is powered by a transformer or power supply, it is essential that these components are also compatible with the dimmer. Some power supplies do not support dimming, so a specific model that allows dimming is needed. Some modern backlit mirrors have built-in control systems, which may already have dimming functions. In these cases, using an external dimmer might not be necessary or even compatible. In general, it is always advisable to consult the manufacturer's manual for the backlit mirror and verify compatibility with dimmers before proceeding with installation. If you are unsure about compatibility, contact us and we can help you with all the necessary information and suggest suitable models!
19. Can I mount a backlit mirror on a tiled wall?
Yes, it is possible to mount a backlit mirror on a tiled wall, but there are some considerations and precautions to take to ensure a safe and correct installation: Choose the right type of fixing. Tiles are usually a hard material, so it is important to use screws or plugs specifically for mounting on tiles. Nylon or plastic plugs for tiles are suitable, but if the tile is very hard (like porcelain stoneware), metal plugs or special anchors might be necessary. Use a drill bit specific for ceramic or tile (usually a diamond or tungsten carbide bit) to avoid damaging the tile surface. To ensure the fixing is solid, mount the mirror where there are whole tiles, avoiding drilling along the grout lines between tiles, as grout lines may not guarantee the same resistance. Accurately measure the position where you will mount the mirror, also considering wiring and possible access to an electrical outlet if the mirror is illuminated. If you do not want to drill the tiles, there are specific adhesives for fixing heavy objects on smooth surfaces like tiles. However, this option may not be suitable for very heavy mirrors or backlit models that require a stable and secure support. During the drilling process, it is advisable to use protective glasses to prevent ceramic fragments or dust from getting into your eyes. Avoid applying too much pressure during drilling to avoid breaking the tile. Once the mirror is fixed, ensure it is well aligned and stable before using the lighting. Check that the mirror is firmly attached to the wall to prevent it from coming off.
20. Is it necessary to make modifications to the electrical system to install a backlit mirror?
In general, it is not always necessary to make significant modifications to the electrical system to install a backlit mirror, but there are circumstances where intervention may be needed. Here are the main cases where the electrical system might require modifications: If the backlit mirror is powered via a power outlet, you can simply plug it into an existing outlet. In this case, no modifications to the electrical system are necessary, as long as the outlet is easily accessible. If the mirror needs to be connected directly to the electrical system (e.g., to power the lighting via a wall switch or for integrated lighting management), it may be necessary to intervene on the existing system to provide the appropriate connection. This might require adding a new electrical line, installing a junction box, or a new power point. If the backlit mirror has a separate switch or a dimmer switch to adjust light intensity, it may be necessary to add or replace a switch in the existing system. If you wish to use a dimmer to control the light intensity, you need to ensure that the mirror's lighting system is dimmer-compatible. Otherwise, you might need to install a compatible switch for the type of lighting and modify the electrical system to support a dimmer. If the backlit mirror requires cables for power, these cables must be properly routed. In some cases, you may need to drill holes in the wall to pass cables or hide the cables behind a conduit, especially if wiring is not already present. If the mirror uses low-voltage lighting (e.g., LEDs), there may be an external or integrated transformer. In that case, it is important that the transformer is positioned correctly, and if the installation requires it, a separate power point or direct connection to the electrical network may be necessary. If the mirror has metal components and is installed in an environment like the bathroom, it is essential that it is properly grounded to avoid the risk of electric shock. If the existing system does not have an adequate grounding system, it may need to be updated. Ensure the installation complies with local safety regulations, especially for installing electrical equipment in humid environments like the bathroom. In some cases, there may be regulations limiting the type of work that can be done without a qualified electrician. In conclusion, if the backlit mirror is designed to be easily plugged into an outlet or if it is located where power is already available, installation may not require modifications to the electrical system. However, if installation requires direct connection to the electrical network, adding a switch, a dimmer, or managing additional cables, it may be necessary to intervene on the existing electrical system. If in doubt or unsure about the intervention needed, it is always advisable to consult a qualified electrician to ensure the installation is carried out safely and in compliance with regulations.
21. How can I ensure that the illuminated mirror is installed correctly and safely?
To ensure that the backlit mirror is installed correctly and safely, there are several steps and precautions you can follow. Verify compatibility between the work performed and the instructions by carefully reading the manual provided by the manufacturer to check if specific installation requirements have been met, and if the type of wiring and fixings are compliant. Verify that it is firmly attached to the wall and does not move. Gently move it to ensure the fixings are tight. Ensure the cables are correctly positioned and not taut or in positions that could cause damage or risk of short circuits. Ensure that metal components are adequately connected to the ground, especially if installed in humid environments like the bathroom. Turn on the mirror and check that the lighting works correctly. If the mirror has a touch sensor, check that it responds as expected. Ensure there are no exposed wires and that the entire electrical system is safe and compliant with regulations. If the mirror is mounted in a humid environment (like the bathroom), ensure it is certified for use in areas at risk of humidity (IP44 or higher for water protection). By following these steps, you can be sure that the illuminated mirror is installed correctly and safely. Finally, for added safety, it is advisable to request a check by a professional, such as an electrician or specialized installer, to also ensure long life and optimal functionality.
22. Can I install an illuminated mirror so that the light turns on automatically?
Yes, it is possible to install an illuminated mirror so that the light turns on automatically, without the need for a manual switch. There are several solutions to achieve this functionality. A common way to make the mirror light turn on automatically is to use a motion sensor. This type of sensor detects movement near the mirror and turns on the lighting when someone approaches. When motion is no longer detected, the light turns off automatically. The motion sensor can be integrated into the mirror or placed nearby. When it detects a person approaching the mirror, it turns on the light and turns it off after a certain period of time (e.g., a few minutes) when no more motion is detected. The advantages are that no button needs to be pressed and there is energy savings, as the light turns off automatically. However, you need to consider that the sensor must be well positioned to avoid false on/off events (e.g., turning on when no one is nearby or turning off too soon). The sensor's sensitivity must be adjusted correctly. Another way is the automatic function with a clock or timer. Some systems offer the possibility of being programmed via a clock or timer installed upstream, automatically turning on the light at a preset time, for example in the morning, for a limited time. The clock or timer allows you to set the light to turn on at a specific time and turn off automatically after a programmed period. Finally, the smart home system (e.g., with devices compatible with Alexa, Google Home, or Apple HomeKit) allows connecting the backlit mirror to a home automation system. In this way, you can program the automatic switching on of the light or activate it via voice commands or an app. The smart plug or smart switch can program the mirror light to turn on based on schedules, events, or voice commands. Devices can also be configured to detect presence, automatically turning on the light when someone enters the room. The advantages are convenience of remote control and home automation, the ability to adjust the light intensity via app or voice commands. Always ensure that any electronic component installed (sensor, relay, switch) complies with electrical safety standards, especially in humid environments like the bathroom. The motion sensor must be positioned correctly to detect movements without giving false signals. Also, it is important to avoid objects or furniture blocking the sensor. In conclusion, installing a backlit mirror that turns on automatically is absolutely possible and can be done using motion sensors, touch sensors, timers, or smart automation systems. Choose the solution that best suits your needs and the type of electrical system you have available.
23. What to do if the illuminated mirror does not turn on after installation?
If the illuminated mirror does not turn on after installation, perform these checks and verifications: If the mirror is connected to an outlet, make sure the outlet is working. You can test it with another electrical device, like a lamp, to check if there is power. If the mirror is connected directly to the electrical system, check that the main switch or the one dedicated to the area where it was installed is on. If the mirror is directly connected to the electrical network, check that the wires are connected correctly. If there are loose or disconnected wires, reconnect them securely. Check the ground connection (if the mirror has a metal component) and ensure the wire is correctly connected. Check the activation sensor (if present) or motion sensor and make sure it is not obstructed and that no objects are blocking its detection field. If the mirror has a touch sensor, try touching the designated area with light pressure. Some sensors might not work correctly if the touch is not registered properly. Check the type of switch and dimmer compatibility (if present). If the mirror is connected to a switch or dimmer, verify that the switch works and is correctly wired. Also ensure it is compatible with the type of lighting. Some dimmers are not compatible with LED lights and may not work correctly. Check for any interruptions in the electrical system such as a blown fuse or a tripped switch. Check the fuses and protective switches in the electrical system. If the mirror has integrated LED bulbs or strips, if possible, temporarily replace them. Check the timer or automatic sensor settings (if present) and ensure the settings are correct. Also check for malfunctions. Restart or reset the system: if the mirror has an advanced electronic system, it might be useful to perform a reset. Some models can be reset via a key combination or a reset switch, consulting the manual. If after performing all checks the mirror still does not work, there may be an internal fault or a manufacturing defect. In this case, contact the manufacturer's customer service for support or to obtain a possible refund or replacement.
24. What is the difference between a regular mirror and an illuminated mirror?
A regular mirror is simply a reflective glass surface without any integrated light source. An illuminated mirror, on the other hand, has built-in LED lights along the edges or behind the surface to improve visibility and illuminate the room or wall where it is installed.
25. What maintenance is required for a common mirror?
Maintenance of a common mirror is quite simple. Remove dust regularly to prevent buildup, clean the mirror every 1-2 weeks with a dry cloth, avoid abrasive products, do not use abrasive sponges, pure alcohol, or aggressive chemicals that could damage the surface and edges.
26. Can I use a regular mirror in humid environments like the bathroom?
Yes, you can use a regular mirror in humid environments like the bathroom, but there are some important considerations to keep in mind to ensure the safety and longevity of the mirror: Traditional mirrors are not specifically designed to withstand high humidity conditions, such as those present in a bathroom. Constant humidity can damage the back of the mirror, which can cause the protective paint to peel off and, over time, damage the mirror itself, causing stains or corrosion. For installation in a bathroom or humid environment, it is better to opt for a moisture-resistant mirror. These mirrors are designed with special materials that protect them from corrosion and humidity. They may have a protective coating or be treated to better resist humidity. If the problem is condensation that forms on the mirror when you shower, you might consider purchasing a mirror with an anti-fog accessory, which incorporates a heating function to prevent condensation from forming. If you are thinking of using a backlit mirror, which is very common in bathrooms, verify that the model is specifically designed for use in humid environments. Bathroom models have an IP (Ingress Protection) rating that indicates their resistance to dust and humidity. For example, an IP44 rating or higher is suitable for use in humid environments, such as bathrooms. If the mirror is illuminated or has an integrated electrical system, it is particularly important that the installation is carried out correctly. A qualified installer must ensure that the electrical cables are protected from humidity and that the system complies with safety regulations for humid environments (such as the electrical code for bathrooms, which requires the use of outlets and equipment protected against humidity and water).
27. How can I prevent the mirror from fogging up in the bathroom?
To prevent the mirror from fogging up in the bathroom, there are several effective solutions that can be adopted. Mirror fogging is caused by condensation of humidity present in the air depositing on the cold mirror surface. Anti-fog (Defogger) is a good device to prevent condensation formation. These mirrors have an integrated heating function that keeps the surface warmer than the ambient temperature, preventing condensation. Good ventilation is essential to reduce humidity in the environment and prevent condensation from forming on the mirror. Maintain a constant temperature in the bathroom, avoiding the environment becoming too cold. Low temperature favors condensation formation when humid air comes into contact with colder surfaces. Uniform temperature promotes anti-fogging. Positioning the mirror in an area not directly exposed to steam and direct water spray is an optimal condition.
28. How can I choose the right size for a wall mirror?
Choosing the right size for a wall mirror depends on several factors, such as the available space, the style you want to achieve, and the functionality you desire. Here are some guidelines to help you decide: On a small wall, opt for a moderately sized mirror, occupying about 1/3 of the wall's width. Generally, a mirror that is too large might make the environment feel overwhelming. On a large wall, you can afford a larger mirror, covering a significant portion of the wall (about half the width). Particularly long or full-length mirrors are suitable for wide walls.
29. What type of mirror is best for an entrance?
Here are some generic suggestions: A full-length or floor-to-ceiling mirror is ideal for spacious entrances. A mirror with an elegant frame is suitable for a sophisticated or classic style. A round or oval mirror for a soft, harmonious effect. A mirror with an integrated shelf or console for a functional and decorative effect. A frameless full-wall mirror ideal for modern and minimalist entrances. A decorative or artistic mirror for a touch of personality.
30. How can I remove limescale stains from the mirror?
A simple and natural method is using white vinegar and water. White vinegar is an excellent remedy against limescale. Diluting vinegar with a little water can be very effective. If stains persist, you can use baking soda, which is a gentle abrasive. Another simple and natural method is using lemon. Lemon juice has acidic properties that can dissolve limescale. Commercial products like a specific glass cleaner or descaling product are ready-to-use solutions. You can purchase a glass cleaner or a specific descaling product to remove limescale from delicate surfaces. Hot vinegar is a natural method suitable for removing stubborn, particularly resistant limescale stains. Heat the vinegar to make it even more effective. Never use abrasive tools to avoid irreparably scratching the mirror, and finally dry it well.
31. Are decorative mirrors only aesthetic or do they also have a practical function?
A decorative mirror, while primarily an aesthetic element, can also have several practical functions. When choosing a decorative mirror, you often not only add a touch of style to the room but also some practical advantages. Here are some examples: A suitably decorated mirror can offer better control of your appearance, such as for makeup. Some illuminated decorations reflect light into the surrounding environment with the function of visually enlarging the space and improving its perception, especially in small spaces. The decorative mirror can multiply combinations with shelves, ledges, coat racks, hidden compartments, and other accessories. Furthermore, a designer mirror with decorative elements assumes functional effects as part of a furnishing composition, adding elegance to a passage area like an entrance or hallway. Finally, it can have the function of "multiplying" decorations, reflecting other decorative items.
32. Can wall mirrors be mounted safely without drilling too many holes?
Yes, it is possible to mount wall mirrors safely without drilling too many holes! There are several alternative solutions that allow you to fix a mirror without having to drill excessively or permanently into the wall. Here are some options: 1. Adhesive mounting strips (e.g., Command Strips) applied to the edges of the mirror (or all contact points) between the mirror and the wall. 2. Adhesive hooks (only for small and light mirrors). 3. Mounting with strong adhesive or mounting glue applied to the back surface of the mirror, following the product instructions for setting times. 4. Suspension frames (cable system), another method to avoid holes using suspension systems with cables. This type of support allows you to hang the mirror on the wall with a single anchor base. Fix a hook or bar on the wall or ceiling and connect the mirror to the hook or bar via a suspended cable. Suitable for small and medium-sized mirrors, allowing you to hang the mirror elegantly and safely without drilling too many holes. 5. Magnetic supports (for light mirrors), another solution that can be used for small mirrors. These magnetic supports attach to both the mirror and the wall, allowing you to fix the mirror without needing to drill holes. 6. Self-adhesive supports for mirrors specifically designed for mounting small and medium-sized mirrors that can support their weight. Attach the adhesive support to the back and position the mirror by pressing it against the wall. No-drill solutions are ideal for light or small mirrors. For very large or heavy mirrors, traditional hooks fixed to the wall with screws are necessary. Also, some adhesive methods require smooth surfaces and may not be suitable for rough walls or particularly textured paint. If the mirror you want to mount is quite large and heavy, it is still necessary to make some holes. If you are unsure of the best solution to adopt, contact us and we can help you with all the necessary technical information and suggest the appropriate solution!
33. How can I prevent the mirror from deteriorating over time?
To prevent the mirror from deteriorating over time, some simple precautions are advisable: If the mirror is in the bathroom, ensure good ventilation (e.g., using a fan or opening the window after showering). Use a soft microfiber cloth and non-aggressive cleaners, avoiding those containing ammonia or acids. Do not spray cleaner directly onto the mirror but onto the cloth, to prevent liquid from penetrating behind the glass and damaging the silvering. Protect the edges with neutral silicone (specific for mirrors) to prevent infiltration. Be careful during cleaning, avoiding impacts and scratches.
34. Can I install a wall mirror by myself?
Generally, you can install a wall mirror by yourself, especially if it is not too large or heavy. Basic tools like a drill, wall plugs, screws, a level, and a pencil to mark the holes will be needed. It is important to ensure the wall can support the mirror's weight and to use the correct supports (e.g., plugs for plasterboard or solid wall).
35. What to do if the mirror is tilted or crooked after installation?
If the mirror is tilted or crooked after installation, check that the supports are aligned using a level. If they are not, slightly loosen one or both screws and reposition them correctly. If necessary, redo one or both holes.
36. Are full-length mirrors suitable for small spaces?
Full-length mirrors are perfect for small spaces because they create a larger and brighter environment, reflecting light and space. Placing the mirror, for example, opposite a window or in a corner can give the room a spacious effect.
37. Can I use a wall mirror in an outdoor environment, such as a garden or terrace?
Yes, it is possible to install a mirror outdoors, such as in gardens or terraces, but with some precautions, such as choosing a mirror resistant to humidity and temperature changes. If it has a frame, it must be made of suitable material such as galvanized or painted metal or treated wood for outdoor use. The glass must be shatterproof or protected by special safety films. Also, it is advisable to place it in a sheltered area, such as under a canopy.